
✔️ 21 Common Reverse Osmosis Problems and Fixes (EASY CHECKLIST)
You researched and bought the best reverse osmosis system for your needs. You feel healthy and happy until the day the system stops doing what it’s designed to do: produce RO water.
Below are some of the most common questions and RO problems I get asked about. I’ll provide you with some DIY instructions so you can get it fixed on your own without having to call someone to do it for you. Plus, the costs for replacing RO systems can add up, so it’s always best to try to fix your RO problems on your own first.
Key Takeaways (Read This First)
If your reverse osmosis system isn’t working properly, most problems fall into a small number of predictable categories. Before you assume the system is failing or consider replacing it, use the points below to quickly narrow down the cause.
- Leaks almost always come from fittings, O-rings, or the air gap, especially after filter changes. Shut off the feed water first, then inspect seals, tubing alignment, and drain saddle positioning.
- Continuous draining is never normal. It usually points to a faulty automatic shut-off (ASO) valve, a failed check valve, a worn RO membrane, or an incorrectly sized flow restrictor.
- Slow water flow is usually a pressure problem, not a membrane failure. Check tank pressure (6–8 psi empty), bladder condition, kinked tubing, and clogged pre-filters before replacing major components.
- A tank that won’t fill needs adequate feed pressure. RO membranes require at least 40 psi to work efficiently, with 60–80 psi being ideal. Too little or too much pressure will stop the system from operating correctly.
- Bad taste or odor means contamination or exhausted filters. Discard the water, replace filters immediately, and sanitize the system to prevent biofilm buildup.
- Unusual noises are usually harmless, caused by pressure, air gaps, or tubing vibration—but persistent gurgling or siphoning indicates a drain line routing issue.
- Regular maintenance prevents most failures. Timely filter changes, pressure checks, and visual inspections can extend system life to 15 years or more.
Find Your RO Problem Fast
No water from the faucet
No water at the RO faucet usually comes down to one of these:
- Empty or waterlogged storage tank
- Closed supply valve
- Severely clogged filters
Start by checking the storage tank. If it feels feather light, it’s empty. If it’s heavy but nothing comes out of the faucet, that’s a different clue.
Weak water flow
Weak flow usually points to a restriction rather than a complete failure. Check the storage tank first. If it’s full but only a weak trickle comes out, the air bladder may have lost pressure. If the tank feels light instead, clogged filters or low feed pressure are more likely.
Tank not filling
An RO tank normally takes 2 to 4 hours to fill after it’s been emptied or serviced, so don’t judge it too soon. If it’s still empty after that, look at feed pressure, clogged prefilters, or tank pressure. A ruptured bladder is less common, but it’s easy to confirm with the air valve.
Continuous draining
A drain line that never stops running isn’t normal. The usual suspects are an Auto Shut Off (ASO) valve, a check valve, or pressure that’s too low for the system to shut itself off. Verify the cause before replacing anything, since these symptoms often overlap.
Water leaking
Water leaks usually come from one of these places:
- Tubing and quick connect fittings
- Filter housing O-rings (especially after a filter change)
- The faucet air gap or drain line
Find where the water starts, not where it ends. That’s almost always the faster diagnosis.
Bad taste or smell
The smell itself is a useful clue:
- Rotten egg: possible bacterial growth or source water issue
- Fishy or musty: expired carbon filters or biofilm
- Metallic: aging membrane or contact with metal plumbing
If maintenance is overdue, start there before assuming the membrane has failed.
Strange noises
Start by noticing where the noise comes from:
- Faucet: trapped air or restricted filters
- Drain: normal wastewater, or a drain line issue if gurgling is constant
- Under the sink: vibrating tubing or a failing check valve
Noises right after a filter change often disappear once trapped air is flushed out.
High TDS
High TDS usually means the membrane isn’t rejecting dissolved solids as well as it should. Check the rejection rate, not just the TDS reading. Compare the input and output water with a TDS meter. If rejection falls below about 80 to 85 percent, the membrane is likely nearing the end of its life.

Common Reverse Osmosis Problems and Fixes
Your reverse osmosis system should last up to 15 years, but you may have problems during that time.

You may experience low to no water pressure and, thus, low water flow. The water tank may not fill up, constantly drain, or the drain line keeps running.
It may be a simple issue like a faulty reverse osmosis automatic shut-off valve (ASO), or the pressure bladder in the tank has developed a leak.
Let’s discuss a few ways to troubleshoot your system.
Reverse Osmosis System Leaking
Discovering a leak in your RO system is not uncommon.
When your tank leaks, the first thing to do is switch off the cold water line that feeds into your RO system.
There are several reasons this can happen. If you are familiar with DIY, you should be able to fix these problems yourself.

Leak at the Faucet
This may be caused by a loose connection in your RO system, or more commonly, it may be caused by an air gap leak.
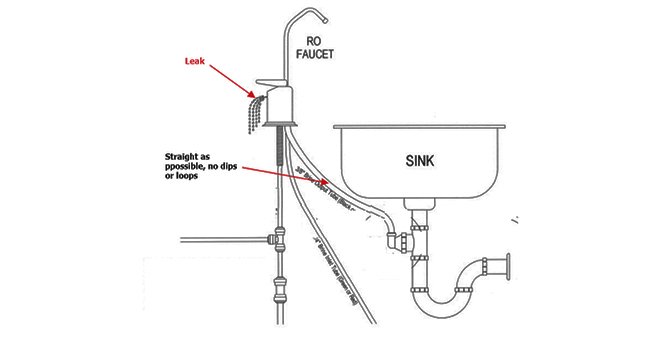
You may need to tighten all the connections if it’s the former. Ensure all the tubing is inserted correctly into its respective valves, ports, and the drain saddle.
Ensure the holes between the drain saddle and the drain hole are aligned — if they aren’t, this could restrict the water flow.
If the leak is from the bottom of the faucet, you will need to replace it.
Leaking from the Air Gap
If the reverse osmosis drain line keeps running, the problem may also be caused by leakage from an air gap.
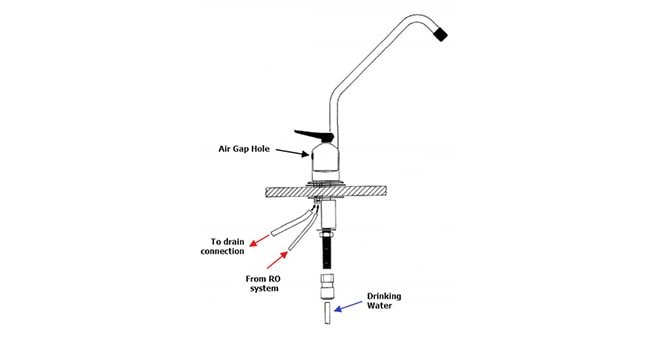
An air gap is a space between a water outlet, e.g, a faucet, and the flood level of a container, e.g., a sink or tank, or with an RO system, the drain.
Gravity directs the flow of water between the air gap and the tank — in an RO system if the tubing between the faucet and the drain saddle is too long, i.e., it does not lie as straight as possible to the connection, water will leak out of the air gap at the bottom of the faucet.
An air gap leak may also be caused if debris has accumulated in the drain line, causing it to clog. Try to avoid putting food and other solids down the drain.
The drain line can be cleaned with a wire brush or pipe cleaner and environmentally-friendly cleaning fluids.
Ensure the drain saddle and line are kept clean to prevent mold growth.
Seal & O-Ring Failures
Check every O-ring, seal, and sealing surface because these parts fail fast under pressure surge, vibration fatigue, or water hammer. A quick inspection helps you identify any wear pattern, surface scoring, or groove wear inside the O-ring groove or O-ring seat.
Most leaks appear when dry O-rings run without seal lubricant (food-grade silicone), which creates friction and leads to binding, compression loss, deformation, or full sealing failure. If you feel resistance while seating an O-ring, stop and check for improper seating, pinching, or debris intrusion. Even tiny trapped particulates, mineral buildup, or sediment migration in the groove block a full 360° seal.
If your system suddenly starts leaking near RO canisters, tubing joints (1/4-inch tubing, 3/8-inch tubing), or the reverse osmosis faucet, treat that as an indicator of component stress or backpressure. Check the pressure vessel and ensure tank pressure stays around 5–7 psi (empty tank) and system pressure stays near 50–100 psi during operation.
| Symptom | Likely Cause | What to Check | How to Fix |
|---|---|---|---|
| Slow drip at housing | Improper installation, over-tightening, improper seating | Check O-ring fit and alignment | Reseat, add lubricant, tighten evenly |
| Hiss when system runs | Air leaks, thread seal failure | Inspect tubing and cap threads | Replace tubing or reseal threads |
| Sudden leak after filter change | Cap distortion, debris intrusion | Inspect cap, clean groove | Clean and re-lube O-ring, reinstall |
| Water at faucet base | Permeate leak, backpressure | Check tank valve and faucet fittings | Reset tank pressure, tighten fittings |
| O-ring keeps failing | Chlorine exposure, component stress | Inspect discoloration and cracks | Replace O-ring, flush system |
Always verify the condition of every O-ring every 6–12 months, especially ones inside the RO membrane housing or high-pressure spots.
Reverse Osmosis System Draining Continuously
There are several reasons why your reverse osmosis system constantly drains.
Although wastewater is generated during the RO process, a non-stop flow of water means something is wrong with the system.
Problems may include:
ASO valve
The ASO valve is controlled by pressure from the tank. A full tank exerts 35-40 lbs of pressure on the valve, at which point the water flow cuts off. A faulty valve will result in the water continually flowing into the drain.
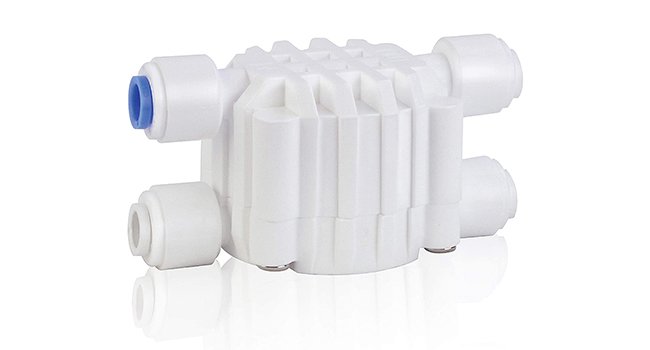
A damaged ASO valve would need to be replaced.
Check Valve
A check valve is a one which allows the water to flow in one direction: if the water flows in the opposite direction, the valve will close to prevent leakage and backflow.
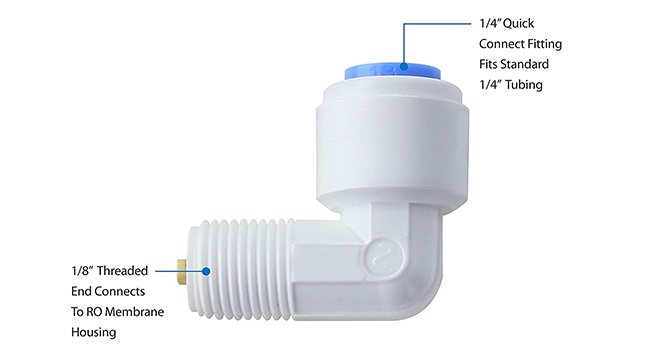
A damaged check valve will allow unrestricted water flow in both directions as the RO system cannot attain the required pressure to shut down.
A faulty check valve would need to be replaced.
RO Membrane
The life of an RO membrane depends on several factors, from how hard or soft (alkaline or acidic) the water is.

RO membranes also cannot withstand temperatures higher than 113o F.
Generally, however, you can expect an RO membrane to last about five years. They should be inspected regularly for mold growth or damage, in which case they should be changed immediately.
A Flow Restrictor
A flow restrictor limits the flow of RO wastewater. It maintains the high pressure of the RO membrane. If this does not work correctly, high-pressure water from the pump will flow unimpeded from the RO membrane reject water outlet.

This will cause low pressure in the RO membrane and therefore a high volume of wastewater.
The rating of the flow restrictor should be 4x the capacity of the RO membrane or at least 18 fl oz per minute.
A flow restrictor of the wrong size will either cause the RO membrane to become blocked or the water pressure to be too low for effective filtration.
The flow restrictor should be changed when the RO membrane is changed.
Reverse Osmosis Water Flow is Slow
You pour yourself a glass of water from your RO system, and all you get is a trickle. Of course, your tank may be empty, but there are a few other reasons why your reverse osmosis water flow is slow.
Low Tank Pressure
To test how full the tank is, pick it up! At full capacity, it will weigh about 20 lbs, so you will easily be able to judge how much water is in it.
If the tank is full, but you are still unable to run water, you will need to test the tank’s air pressure when it is empty. You can use a bicycle or tire pump to test the pressure: this should measure between 6-8 psi when empty and between 35-40 psi when full.

Ruptured RO Tank Bladder
Most often, the cause of slow water flow is the condition of the air bladder contained in the tank.
If this is ruptured, it will leak air and cannot build up enough pressure to pump water out of the tank.
If the bladder pressure is low, you can try to repressurize it by slowly pumping air in and measuring the psi after each inflation. However, if this does not work, you will have to replace the entire tank.
Clogged RO Membrane
Another cause may be that a clogged RO membrane is causing slow water flow.

The RO membranes will clog up if they have to process hard water. If the water contains high concentrations of calcium, magnesium, iron, and sediments, the lifespan of the RO membrane will be shortened.
Pre-filter carbon cartridges should be replaced every 3-6 months, as this can also affect how long a RO membrane remains effective.
Kinked Water Line
The third reason for slow water flow is that the tubing may be kinked. Depending on the severity of the distortion, you can either try to straighten it or it may have to be replaced.
Crimped tubing will reduce the water pressure and, thus, the flow.
Reverse Osmosis Tank Not Filling Up
Your reverse osmosis storage tank not filling up could be caused by several factors.
You may simply be using the water too fast, and the tank is not able to fill up, but there could be other underlying reasons.
Water Pressure
The requisite reverse osmosis water pressure for the membrane to work effectively is 40 psi. Anything less than that and the amount of water filtered will be reduced.
In this case, you can buy a booster pump to increase the pressure sufficiently or simply use a bicycle pump.
On the other hand, if the water pressure is too high, the water will not be able to reach the tank.
To fix this issue, you can buy a pressure-reducing valve (PRV)
The optimum pressure is between 60-80 psi.
Clogged Filters
Your RO system pre-and post-filters may be clogged. If this happens, there will be reduced water flow to the semipermeable membrane, further resulting in the tank not being sufficiently filled.
The stages of RO filtration could include sediment and GAC (granular activated carbon) filters, then the semipermeable membrane, and finally a carbon polishing filter. Some RO systems offer a further filter to replace some of the minerals removed during the RO process.
Clogged RO Membrane
RO membranes may clog up if the water is too alkaline, i.e., hard.
To alleviate this, you can either use a good water softener (my best is Simplysoft® 60,000 Grain Softener Aquasana) or replace the membranes more frequently, which will add to your costs.
Clogged filters will have to be replaced as they will not filter the water to an acceptable standard, thus preventing the whole RO process.
Taste and Odor in RO Water
The point of producing reverse osmosis water is to have access to pure, filtered water free of unhealthy minerals and chemicals.
Any RO water that has an unappetizing odor should be discarded, and the RO filters replaced immediately.
It is possible to buy an RO system with a modular filter configuration. This means that all the filters and membranes are disposed of and replaced simultaneously, lessening the risk of contamination.
Water Smells Fishy
RO water with a metal taste is usually caused by metal elements like barium and cadmium.

Another cause could be the presence of chloramine, a compound of chlorine and ammonia. This is used to disinfect public water sources but may leave you with a fishy odor in your RO water.
Water that is warm and exposed to indirect sunlight makes perfect conditions for algae blooms, which usually occur in the summer. This is especially prevalent in lakes and water reservoirs.
Water Tastes like Plastic
If your RO water tastes like plastic, it indicates your system is not working properly.
Also see: Water Brands that use Reverse Osmosis
The filters and membranes must be replaced regularly, and the entire system should be cleaned and sterilized regularly.
Water Tastes Funny
Contaminants can accumulate in your RO system, and if this is not cleaned regularly, harmful biofilm can build up, potentially causing serious health problems. Any RO water that has an odd taste should be discarded and the filters replaced before any more water is processed.
How to Improve the Taste of RO Water
Adding a carbon filter to the RO process will assist in removing contaminants like hydrogen sulfide, which makes water smell like rotten eggs.
It is also an option to remineralize RO water, which will replace some of the minerals of the beneficial salt that are removed during the RO process. These include sodium, magnesium, and calcium. These will make RO-treated water taste more like ‘normal’ water.
Reverse Osmosis System Making a Noise
If you hear strange noises from your RO system, it is generally nothing to be concerned about.
Sounds from your RO system will be caused by the tubing being under pressure — that is how the system works.

Hissing sound
Any hissing sound that emanates from the RO system is likely to be caused by air pressure in the air gap or the drain. This usually happens after the filters are replaced and should not last longer than a day or two.
Check that the tubing and drain lines are not blocked and that the water has a clear flow.
Clicking noise
Any clicking noise can be eliminated by shortening the tubing. This will reduce air bubbles and, subsequently, noise.
The vibration of the tube, which is under pressure, may make a noise.
Reverse Osmosis System Gurgling
If your RO system gurgles, it is probably caused by a difference in level between the drain line and its connection to the drainpipe. Water leakage from the end of the pipe can cause the drain tube to siphon and make a gurgling noise.

The secret is to have no low points in the drainage tubing – if it flows vertically, the water will drain steadily with no sound effects.
When the pressure tank is being filled, there may be some gurgling, but there should be no noise once this has been achieved.

Check These Things Before Replacing Any Parts
Did the problem start after changing filters?
If the trouble started right after changing filters, the service is often the cause. Check for:
- Trapped air in the system
- Filters installed in the wrong position or direction
- Loose tubing or pinched O-rings
These are much more common than a membrane failing overnight.
Did the problem start after installation?
If the issue appeared right after installation, double-check the basics:
- Filter arrows match the direction of water flow
- Tubing is fully seated in every fitting
- Filter housings and O-rings are seated correctly
A simple installation mistake or trapped air is far more common than a defective membrane.
Has the system been unused for a long time?
A long idle period changes the diagnosis. Stagnant water can encourage bacterial growth inside the filters, and the membrane may dry out if the system sits unused for weeks. In many cases, replacing the filter cartridges is a better choice than simply flushing the system and hoping it recovers.
Was plumbing work recently done?
If plumbing work happened recently, check these first:
- Air trapped in the RO lines
- Lower feed water pressure after plumbing changes
- Loose quick connect fittings or saddle valves
A simple pressure change or disturbed connection can create symptoms that look like a failing RO system.
Are all feed and tank valves fully open?
Both the feed water valve and storage tank valve should be fully open. Even a valve that’s only partly closed can reduce water flow and lower the pressure needed for the RO membrane to work properly. It’s a quick check that can save a lot of unnecessary troubleshooting.
Do you have a tank-based or tankless RO system?
Knowing your system type helps narrow the diagnosis.
- Tank-based: Stores filtered water in a pressurized tank.
- Tankless: Filters water on demand using an internal pump.
Problems that are normal on one design may point to a completely different cause on the other, so identify your system first.
When to Stop DIY Troubleshooting
Cracked housings and pressure vessels
Shut off the water supply if you find a cracked housing or pressure vessel. Even a small hairline crack, damaged threads, or a leak that sprays under pressure can quickly turn into major water damage. Replace the damaged part instead of trying epoxy, extra tightening, or other temporary fixes.
Electrical pump problems
Disconnect power if the booster pump shows electrical damage. Burnt smells, melted plastic, exposed wiring, or a motor that overheats are not routine repairs, especially around water. If those signs appear, stop troubleshooting and replace the unit or contact the manufacturer or a qualified technician.
Persistent contamination
Stop troubleshooting if contamination keeps coming back. When bad tastes, odors, or high TDS remain after replacing the membrane, changing prefilters, and sanitizing the housings, the problem likely goes beyond routine maintenance. At that stage, a professional diagnosis or full system replacement may be the better option.
Repeated leaks after repair
Stop DIY repairs if the same connection keeps leaking after two or three attempts. Repeated leaks, multiple leak points, or signs of cabinet swelling often point to a larger system problem, not a simple gasket or fitting. That’s the time to call a professional.
Information to collect before contacting support
Before contacting support, have these details ready:
- Brand and model number
- Recent pressure and TDS readings
- System age and maintenance history
- The symptoms you see and the troubleshooting steps you’ve already tried
This helps the support team narrow down the cause much faster.
Main Components of an RO System (for Troubleshooting)
Each component in a reverse osmosis system plays a specific function. When one part fails, it creates a clear cause-and-effect pattern that shows up as leaks, low flow, poor taste, or no shut-off.
Filters (prefilter, sediment filter, postfilter)
The prefilter and sediment filter protect the system by stopping sediment clogging and chlorine oxidation before damage occurs. When these filters fail, flow rate drops, pressure loss increases, and oxidation damage reaches the RO membrane.
The postfilter provides a fresh pass using carbon filtration and carbon post-polishing before water delivery to the faucet, refrigerator, or ice maker.
RO membrane
The RO membrane controls contaminant rejection, water production, and production rate. It relies on feed pressure, driving force, and a stable pressure differential to function correctly.
Low line pressure, high TDS, or temperature impacts reduce permeate output and increase performance loss.
Flow restrictor
The flow restrictor creates resistance in the drain flow to maintain proper driving force across the RO membrane. An incorrect membrane output rating or a worn restrictor causes flow disruption, excess reject water, or constant draining.
This component directly affects system shutdown behavior.
Check valve
The check valve prevents backflow at the membrane outlet and protects against back pressure. It allows the system to build pressure as the storage tank fills.
Failure here leads to no shut-off, pressure imbalance, and possible membrane damage.
ASO valve (automatic shut-off valve)
The ASO valve performs pressure monitoring between feed supply and tank pressure. When tank pressure reaches 2/3 of line pressure, hydraulic closure stops incoming feed water.
A failed automatic shut-off valve causes nonstop drain flow and prevents full system shutdown.
Storage tank
The storage tank acts as a pressure vessel with an internal air chamber separated by a diaphragm. As water enters, rising air pressure pushes water out during faucet delivery.
Loss of air charge or diaphragm integrity causes weak flow, empty taps, and slow tank fill cycle.
Drain saddle and drain connection
The drain saddle connects the system to the sink via a drain connection. It carries away contaminants and prevents sewage backup.
Improper alignment restricts flow and contributes to system stress and noise.
Air gap
The air gap provides backflow prevention at the faucet by separating the drain and feed supply. Plumbing codes require this cross connection break to protect drinking water.
Blockages here cause leaks, gurgling, and visible flow disruption.
Feed pressure
Feed pressure controls overall operation, rate, and performance. Low pressure reduces water production, while excessive pressure increases component stress.
Stable pressure keeps the hydraulic system balanced and prevents early failure.
Testing RO system flow rate
Permeate flow rate test
Start by closing the tank valve so the storage tank stays isolated during the test. Open the faucet fully to force direct flow from the RO membrane and wait until a fast drip turns into a consistent drip. This step confirms you are measuring real membrane production, not stored water.
Place a measuring cup under the faucet and begin the collection method once the drip stabilizes. Capture the product water for exactly 60 seconds to lock in a reliable test duration. The accumulated volume you collect represents the true permeate rate.
Compare your measured output in ounces or ounces/min against the system’s production rating in gpd. Under normal feed pressure and stable water temperature, the numbers should closely align during chart comparison.
Small variation is acceptable, but major gaps signal reduced membrane function or overall performance loss.
Typical permeate flow reference
Use this table for quick rate comparison and flow verification during troubleshooting.
| membrane rating (gpd) | expected permeate rate (ounces/min) |
|---|---|
| 15 | 1 – 1.3 |
| 18 | 1.3 – 1.8 |
| 25 | 2 |
| 36 | 2.5 – 3 |
| 50 | 3 – 4 |
| 75 | 4.5 – 6 |
| 100 | 8 – 9 |
| 150 | 10 – 13 |
Drain flow rate test
To determine whether flow restriction supports proper driving force pressure, disconnect the drain line from the drain saddle. Point the open tube into a bucket so all drain water collects cleanly. This setup creates a controlled diagnostic step without system interference.
Use a large measuring cup to capture the water volume for exactly 30 seconds. This fixed measurement duration ensures reliable flow measurement without guesswork. Once collected, multiply the result by 2 to complete the rate calculation.
Perform a direct comparison between your calculated output and the manufacturer’s chart reference. Proper drain output confirms restrictor validation and overall system balance. Large deviations indicate a likely cause of poor performance and guide the next troubleshooting method.
Typical drain flow rate reference
Use this table to support flow verification and accuracy check during testing.
| membrane rating (gpd) | expected drain flow rate (ounces/min) |
|---|---|
| 15 | 100 – 110 |
| 18 | 180 |
| 25 | 250 |
| 36 | 300 |
| 50 | 350 – 400 |
| 75 | 575 – 650 |
| 100 | 730 – 900 |
| 150 | 1200 |
An RO system can be expensive and should be checked regularly for defects and impurities.
RO System Maintenance Checklist
1. Testing the RO feed water
2. Testing the chlorine and alkalinity levels
3. Setting timers for pre-filters and water softeners
4. Noting the RO pump pressure, flow rate, and water temperature
5. Logging water flow rates
6. Testing RO wastewater and flow rates
7. Checking pressure gauge readings
8. Changing pre-filters
9. Changing the semipermeable membrane
Some of these checks may need to be undertaken by a professional company.
Full Checklist PDF here.
Also, see my guide on the best under-sink filters if you are looking to get a new model.